From “For Sale” to “Welcome Home:” A Step-by-Step Guide to Closing
Whether you’re upgrading, downsizing, relocating for work, or ready to retire, the decision to purchase or sell a home involves many factors. No matter the reason for your move, there’s a lot that happens in between the time a “For Sale” sign is pounded into the seller’s yard and when the keys to the new residence are placed into the hand of the buyer.
First-time home buyers and sellers in particular may not know what to expect at closing time, or what a closing entails from start to finish. The closing process is everything that occurs from when the seller accepts an offer until the close date, or the date when ownership of the home is officially transferred to the buyer.
The Closing Process
Here’s a helpful guide to help you understand each step in the closing process:
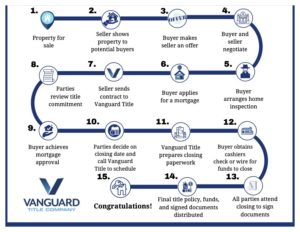
- Property for sale
Naturally, the first step in the closing process begins with the seller listing their property for sale. As the seller, you’ll need to choose whether to work with a real estate agent (or listing agent), or to sell the home yourself. An agent markets the home, lists it on the MLS database, prepares paperwork, and communicates with the buyer’s agent. In exchange for their services, the listing agent will typically charge a commission, which they split with the buyer’s agent.
- Seller shows property to potential buyers
Once your home is listed, you’ll need to keep it clean, tidy, and clear of clutter in preparation for showings — a vital part of the selling process. Allowing as many potential buyers to tour your home as possible may increase your chances of receiving multiple offers. It’s usually helpful to vacate the property so homebuyers can peruse without distraction.
You’ll want to re-stage the home each day in preparation for impromptu showings. It may be helpful to reserve a few evenings each week for showings. Alternatively, you may prefer to organize viewings by appointment only to allow more time to prepare. Your agent will provide a lockbox so they can enter the home at their appointed time. Your agent may also consider hosting an open house to reach several potential buyers in one day.
- Buyer makes seller an offer
Now that you’ve generated interest through showings, the offers should start to come in — especially if your agent has marketed your home well and priced it appropriately. In the current seller’s market, this could even happen as soon as your home hits the market. However, you may have to wait until after a few showings. Generally, the better condition your home is in, the more offers you will receive and the easier it is to justify the price.
An offer will typically include the amount the buyer is willing to pay, requested dates for closing and taking occupancy, and any contingencies (such as the sale of the buyer’s current home or a satisfactory home inspection). Keep in mind: The highest bid isn’t necessarily the best offer. For example, if the offer is contingent on the buyer’s ability to finance the property, you could end up back to square one. Your agent can help you examine the strength of each offer.
- Buyer and seller negotiate
Next come negotiations between the seller and potential buyers. If a seller receives an offer that they consider too low, they can submit a counter offer to begin the negotiations. And, if a buyer isn’t satisfied with the counter price, they could suggest another compromise. Of course, negotiating power is largely dependent on market conditions.
In a seller’s market, for instance, buyers typically don’t have as much leverage. If a buyer’s offer is low or complicated by contingencies, the seller may not even bother negotiating. In addition, buyers need to act fast in a hot market, possibly making an offer the same day they tour the property. As a buyer, if you’re not pre-approved for a loan, your offers will likely be turned down in favor of buyers who can provide a pre-approval letter.
- Buyer arranges home inspection
Shortly after the seller accepts an offer, the buyer will need to schedule a home inspection. On top of an appraisal, the buyer will likely ask for a home inspection within a few days of going into contract to ensure that they’re making a sound investment. A home inspector will examine the condition of the home’s structure, roof, electrical system, and plumbing. They’ll also study the home’s interior and exterior for defective, hazardous, or mechanical issues, as well as check for pests.
When complete, the inspector will provide a report to the buyer outlining what was inspected and which repairs may be necessary. The seller should have already delivered their seller disclosures prior to signing the contract. By law, homeowners must provide a full disclosure of issues they encountered while living in the house that may affect the home’s property value or appeal. For example, for homes built before 1978, owners must disclose whether there is lead-based paint. If everything looks good the buyer proceeds to the next step.
- Buyer applies for a mortgage
Now’s the time for the buyer to continue with the application for a mortgage loan from the lender of their choice. As a buyer, it’s a good idea to get quotes from multiple lenders, and you are not obligated to use the lender that pre-approved you. Lenders will ask about your income, employment, debt and assets. Be prepared to provide current bank statements, tax returns, W-2s, credit history, and more.
The lender can help you determine which type of mortgage best fits your situation. This could be a fixed or adjustable-rate mortgage, and a conventional or government-issued loan (VA, FHA, USDA). You’ll be provided with a loan estimate outlining the terms of your loan, with estimated closing costs, interest rate, and monthly payments (principal, interest, taxes, and insurance).
- Seller sends contract to title company
Once the buyer and seller have signed the real estate contract for the purchase and sale of the home, the sellers agent should submit the contract and earnest money check to a reputable title company, which will set up a working file for the transaction. To protect both the buyer and seller pursuant to the terms of the contract, the title company will open an escrow account and hold the deposit and contract until the closing is complete.
- Parties review title commitment
Shortly after the title company handles your real estate contract, it will conduct a thorough title search to confirm the property’s legal ownership and reveal any claims or liens on the property. Then, it will issue a title insurance commitment that is sent to both the buyer and seller and their representatives, essentially serving as the company’s promise to issue a title insurance policy for the property after closing.
Because the title commitment contains the same terms, conditions, and exclusions that will be in the actual insurance policy, it’s important for the buyer to carefully review the document, as it should disclose any defects in title. For example, it may show if there are any easements, deed restrictions or liens on the property. Typically, if the buyer objects to an entry on the commitment, they must state their objection within a certain period of time, or the defect will remain as an exception to the final policy..
- Buyer achieves mortgage approval
Receiving mortgage approval, which can take several weeks, is an exciting step in the closing process for buyers. Prior to approval, an underwriter will examine your finances to determine whether you can afford the home loan you’re applying for, and whether the home you’re buying provides sufficient collateral for the mortgage. After the underwriting team has completely verified your eligibility qualifications and granted your loan final approval, you’ll be ready to close on your loan.
- Parties decide on closing date and call title company to schedule
After the buyer is clear to close, it’s time for the parties to schedule a closing date with the title company. The closing will take place at the office of your title agent, real estate agent, or attorney, and marks the completion of your real estate transaction. The parties can expect to sign a lot of paperwork, including signing the deed to the property over from the sellter to the buyer. In some cases, you may be able to sign portions of the paperwork ahead of time. You may even be able to schedule an online closing from the comfort of your home or other location.
- Title company prepares closing paperwork
With your closing scheduled, the title company will get down to the business of preparing the real estate settlement documents for signing.
Buyer documents may include:
- Owner’s title insurance policy
- Closing disclosure and/or ALTA Settlement Statement
- Affidavits and miscellaneous documents necessary to purchase the property
- Personal identification documents
- A Lender provided mortgage package for signing
Seller documents may include:
- ALTA Settlement Statement
- Bill of sale
- Warranty deed
- Affidavits and miscellaneous documents to clear title
- Power of attorney (if applicable)
- Buyer obtains cashier’s check or wire for funds to close
At the closing, the buyer is responsible for paying for closing costs, the down payment, prepaid interest, property taxes, and insurance. Instead of a personal check, you’ll need to provide a cashier’s check made out in the amount specified by your lender or title insurer before closing day. With a cashier’s check, your bank certifies that you have the funds available to pay the amount written on it. Depending on the amount needed for closing ,the title company may require you to use a wire transfer to move money directly from your financial institution to the payee’s.
- All parties attend closing to sign documents
On closing day, the parties may meet to sign the key documents that transfer ownership of the home to the buyer, and to pay for closing costs, lending fees, and any taxes that are due. While you may be nervous as the day approaches, you can gain peace of mind by gathering your paperwork, getting your cashier’s check and communicating with the title company and your real estate agent before the big day. They will provide you with a list of items you’ll need to bring with you to the closing.
- Final title policy, funds, and signed documents distributed
Once closing is finally complete, there are just a few more issues to take care of, including:
- The title insurance policies are prepared and distributed to the lender and new owner at closing
- The deed and mortgage are sent to the Register of Deeds office to be filed in the county where the property is located
- The escrow agent or closing company forwards payment to any involved parties, if they haven’t received or collected payment yet
- The original signed lender documents are returned to the lender for final review
- Congratulations!
After several months of due diligence and preparation, it’s time to put on your party hat and celebrate — your closing is complete and the buyer is now the official owner of the property!
Vanguard Tile Is Here to Answer Your Questions
At Vanguard Title, we understand the process of buying or selling a home can be stressful. Our team of experienced title and closing professionals are here to answer your questions and help you with every aspect of your closing. Whether you’re a buyer or a seller, we strive to make each interaction a positive one for all parties involved.
The knowledgeable customer service, escrow and closing teams at Vanguard Title have your best interest in mind. And, we’ve successfully closed thousands of real estate transactions throughout the state of Michigan since 1987. By delivering personalized service and professional results, we strive to assure you a stress-free real estate transaction, so you can focus on what matters most — your new home.